Did you know that you can navigate the posts by swiping left and right?
Brewing your own BrewPi
22 Jan 2018
. category:
homebrewing
.
Comments
Like most people, I found out how important controlling fermentation temperature is only after making a huge mistake and letting a batch of beer ferment about 10 degrees Fahrenheit over the yeast strains max temperature. And it was so horrible I had to dump it all, it wasn’t even close to drinkable. And I think my next actions where the same as most others as well, got my hands on an old cheap fridge (stand up freezer in my case), purchased an STC-1000 relay with temp probe, and built something I could control fermentation temperature with. 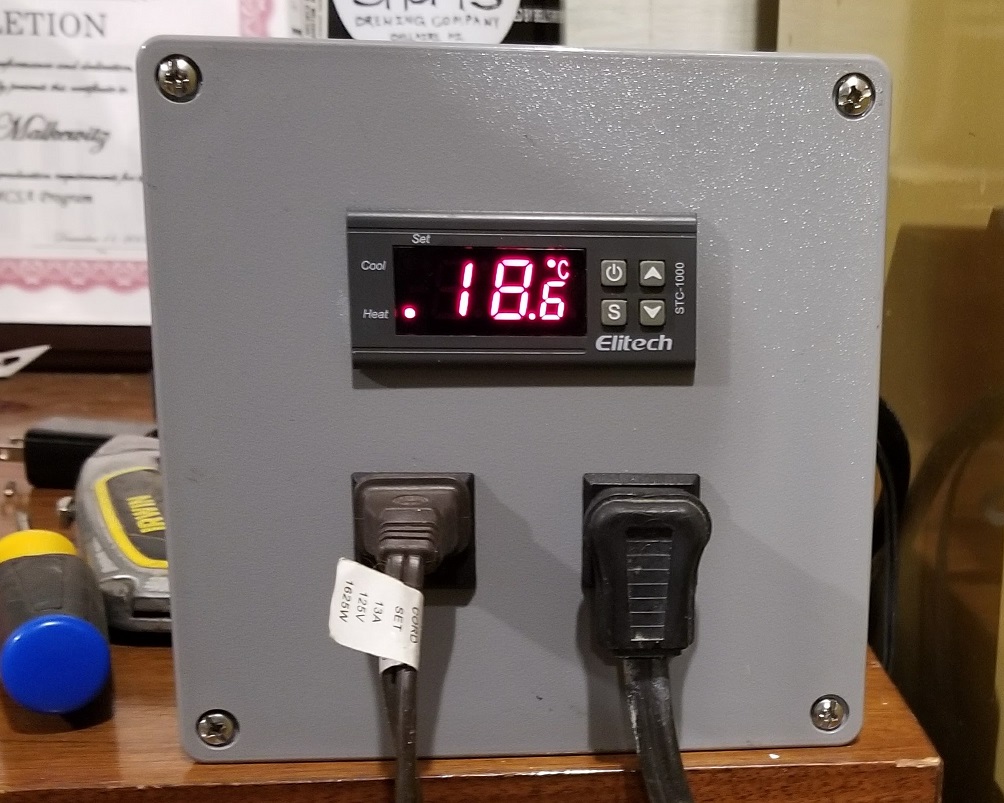 This is a quick, and cheap solution, and it does work, but the biggest issue I was running into, was temperature swing. I would set my target temperature, and when it would cool, it would sometimes go 2-3 degrees Celsius (yes, I bought a Centigrade controller by accident, and they are one or the other) past the target. Then the heater would turn on and go 1-3 degrees over. And, especially as fermentation wound down, and the beer was creating less of its own heat, this would get even worse. And I’m sure this doesn’t affect the beer tremendously, but I still didn’t like it. Also it seemed like it was making my freezer and heater work much more then necessary as they where fighting each other. There has to be a better way!
I started my research around the interwebs looking for other ways to build (or buy, but we all know building is more fun) a temperature controller, seems most everyone does it with the STC-1000 or some variation of it, but I kept seeing talk about building a BrewPi. And the more I looked into it, the more interested I became. And at the time, I did have an extra Raspberry Pi laying around, so that made it even more appealing being that is one of the more expensive pieces of the project. The concept is pretty close to the STC-1000, the only real difference is you adding a second temperature probe (or more), and microcontroller (an Arduino Uno in this case) that runs a PID. Basically, the system will learn how your fermentation chamber heats and cools, and it can compensate for the temperature swings. I know what your thinking, how much better can it be then the STC-1000. Well, my first batch I fermented with this held the center of the beer to .01 degree Fahrenheit for the entire primary fermentation process. Now, even if a few degrees doesn’t affect it that much, I’m sure that holding the temperature that steady is going to produce a better final product. And, it gets even better, after learning how the profiles work with a BrewPi, you can set it up do all sorts of different things. For example, with my last beer, when I dry hopped it, I set it to slowly bring up the temp to max in the yeast range over a 24 hour period, then hold that for 24 hours for a diacetyl rest, then as quickly as possible, bring it down to 34f for a cold crash, and hold that for 48 hours. And I never have to touch anything for that.
If you’ve made it this far, im guessing that means your still interested in building one of these bad boys. And that is one of the main reasons of this writing, when I built mine, the info to get it working was spread all over the web, I had a bunch of dependency issues, and one obvious thing, was a case to hold it all, none of the articles or how to’s, or blogs, did anyone really ever tell how they have this thing in production. And there is more then a few parts, and well, 110v running in it, so I thought that was a pretty important part, so I’ll show what I used for a case to house this controller.
Also, I want to make this clear, the development of the BrewPi over the years has out grown and surpassed what the Arduino is capable of. What does this mean exactly? Well, what you’d be building by following the instructions of this blog, is what would be considered a “legacy” version of BrewPi. The Developer of BrewPi, Elco Jacobs has actually created a pre made unit that is available for purchase, that uses the current version of BrewPi and is actively developed and well maintained. If the DYI thing is not for you, maybe check out the BrewPi Spark. And Because we will be making a legacy version of BrewPi, There will be no software updates or new features, but it is very solid and stable, and does work very well. And, if you really want to make a change or add a new feature, you can always fork the BrewPi Repository, and put the code changes in yourself!
You will be working with electricity while building this project, if you’re not comfortable with that or don’t know what you’re doing, do not attempt this build. Anytime you need to work on the hardware of this system always, always, always unplug it completely. There will be 110v running inside this circuit. PROCEED AT YOUR OWN RISK!
Shopping list
Lets start with a shopping list shall we. Now, you don’t need to buy these via the links I am providing, they are merely for context. Also, look in your junk drawer, things like the RaspberryPi and Arduino power supply I found around the house, one was an old phone charger, and the other was to and old light that I hadn’t seen in years. The power cable is from an old computer. I used some Romex wire that I already had as well.
- RaspberryPi 3
- Arduino Uno
- Two Channel Relay Module
- 8G Micro SD Card
- Three Position Screw Terminal
- Jumper Wires
- Outdoor Sprinkler System Case
- Raspberry Pi 3 Power Supply 5V 2a minimum
- Arduino Uno Power Supply 9v 1a minimum
- Temperature Probes
- 4.7k Ohm Resistor
- Power Cable
- Outlets for the Heat/Cool
- 16 AWG Wire
Configuring the Raspberry Pi and Arduino Uno
I think the best place to start with this project is setting up the Raspberry Pi and the BrewPi software. The easiest way to do this is to use the NOOBS installation of Raspbian from raspberrypi.org (you can install any flavor of Linux you like, but Raspbian is what I have built my BrewPi on). Here is what you will need to configure the SD card using Windows, sorry if your using Linux to copy the image to the SD card, you’ll have to figure out those steps yourself (Same goes for flashing the hex file to the Arduino Uno):
Installing Raspbian on your Raspberry Pi is pretty simple:
- Plug the SD card in to your machine.
- Run the SD Formatter program and format the SD card.
- Extract the NOOBS zip folder.
- Copy all the contents from the extracted folder to the formated SD card.
- Insert the SD card into the Raspberry Pi after the file copy completes.
- Power up the Raspberry Pi
- Install the Raspbian Linux Distribution.
Now, the install will take about 10 minutes, while it is going, go ahead and plug the Arduino Uno into your computer via a USB cable so you can flash the BrewPi firmware onto it. You will need to download the following items for this:
- BrewPi 2.10 Arduino Uno Rev C Firmware
- Arduino Sketch Uploader 3.1.0 (latest version as of this writing)
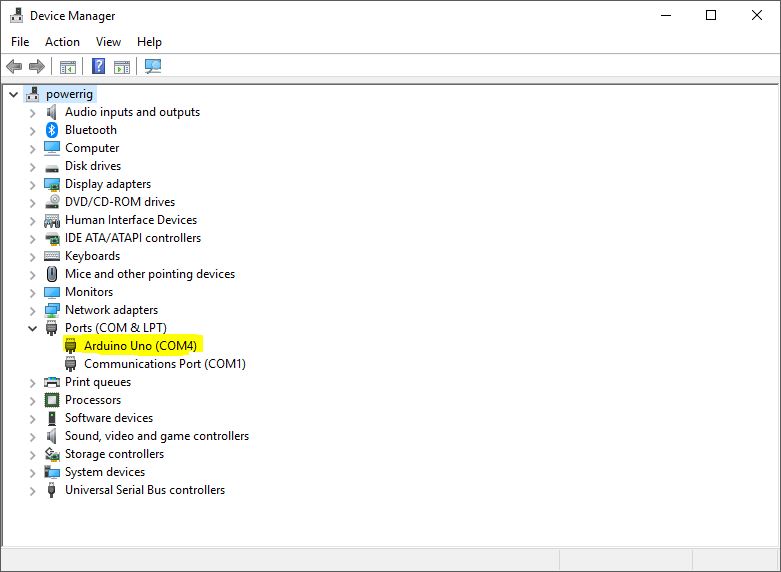
You need to identify the COM port the Arduino Uno is on, to do this open your Device Manager:
- Start Menu -> Type Device Manager.
- Expand out the Ports (COM & LPT) section and note the number.
After extracting the Arduino Sketch Uplaoder, flash the hex file to the Arduino Uno via the Windows command line replacing DownloadPath with the file path to the location of the hex file and Number with the number you found in Device Manager:
ArduinoSketchUploader.exe --file=<DownloadPath>brewpi-arduino-uno-revC-0_2_10.hex --model=UnoR3 --port=COM<Number>you’ll see a bunch of text go across the screen, just wait until the command prompts comes back, only takes a minute or two.
back to the pi……
After the completion dialog box for the Raspbian install on the Raspberry Pi comes up, go ahead and reboot it. After the Raspberry Pi comes back up, it will auto login to your new install of Raspbian. Now there are a few basic configuration you are going to want to change to the system before we get started:
- Open the Raspberry Pi Configuration Menu:
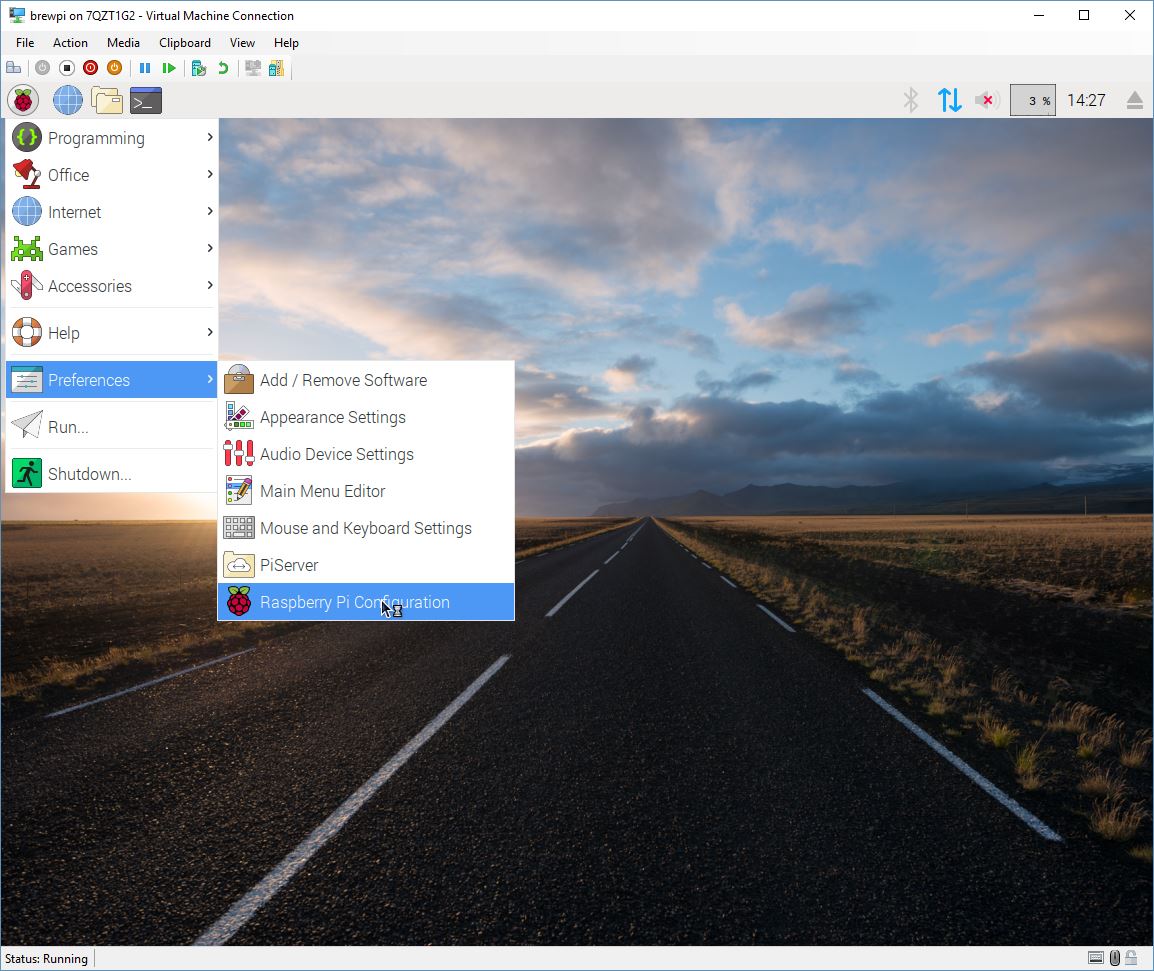
- On the System tab:
- CREATE A PASSWORD, by default there is no password, do not leave it this way, there is no reason to.
- Give it a hostname, I called mine brewpi (no surprise there).
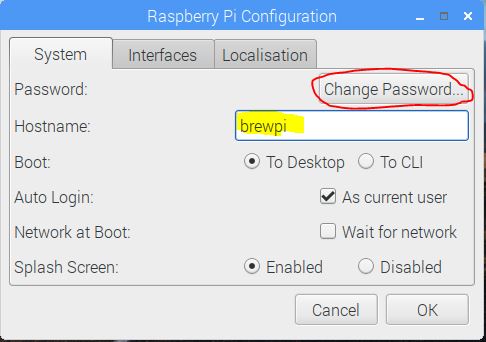
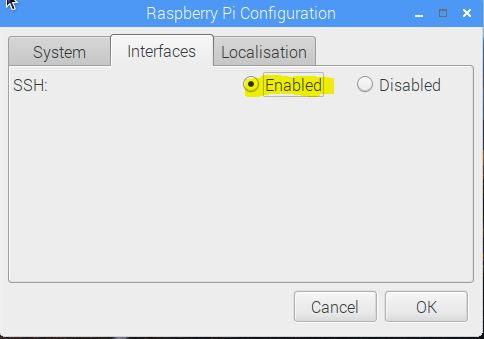
- On the Interfaces tab:
- I enable ssh here, this will allow you to interface with the terminal remotely, I don’t keep a keyboard and mouse hooked to this after the initial configuration, so I would suggest enabling this, and this is also why a password is good, so not just anybody can ssh to your BrewPi (you may see many more interfaces on you system, this is because I’m emulating this on a virtual machine so I can take screen shots).
- On the Locale tab:
- At least set the timezone.
- Set the location if you’d like, the rest you can leave defaults
- It may ask you to reboot after these settings, select the option to reboot later, and connect to your WIFI before rebooting the Raspberry Pi.
- Just click on the icon in the top right (again, I’m running on a VM, so it doesn’t see the bound adapter as a wireless adapter) select your network, and authenticate
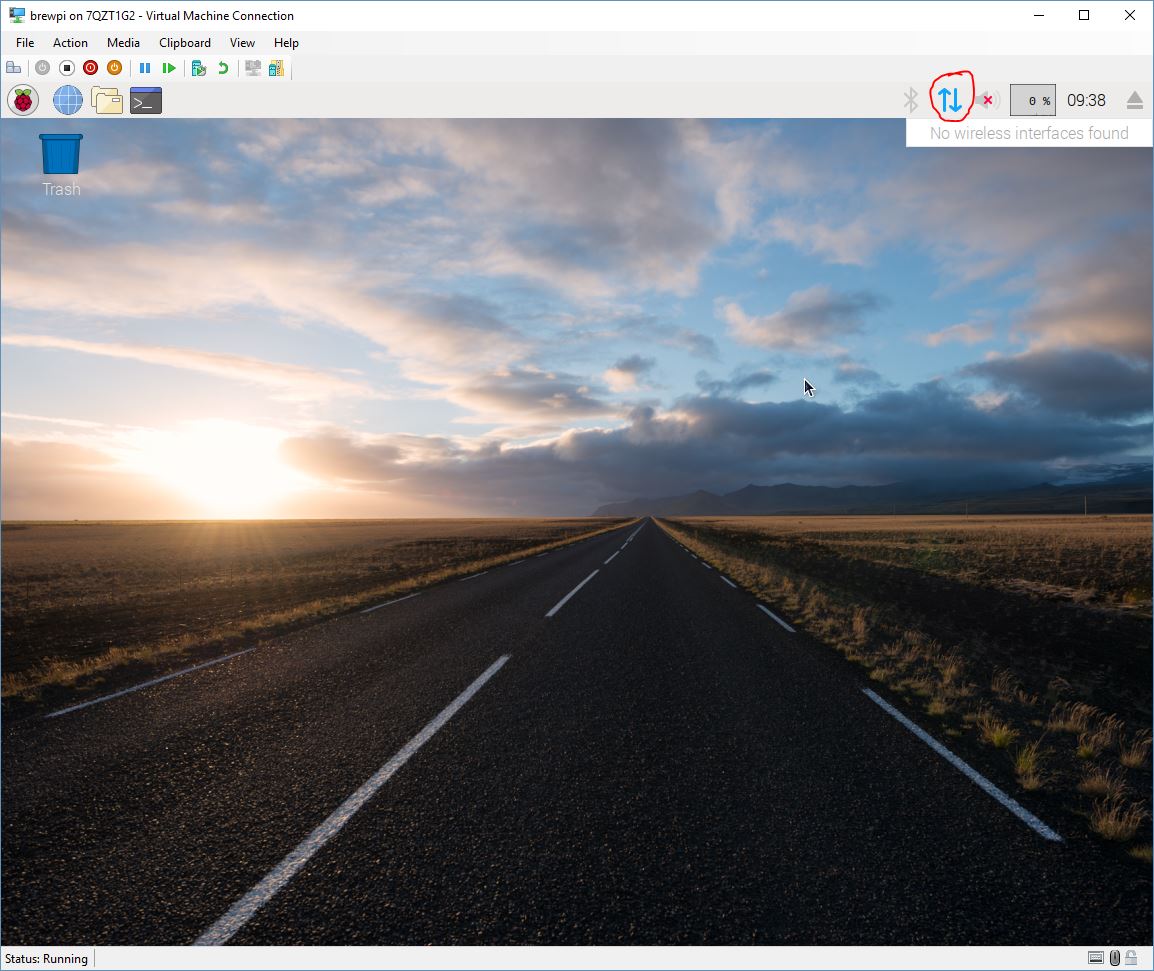
- Now reboot (the reboot option is under the Raspberry Menu, same place as step 1).
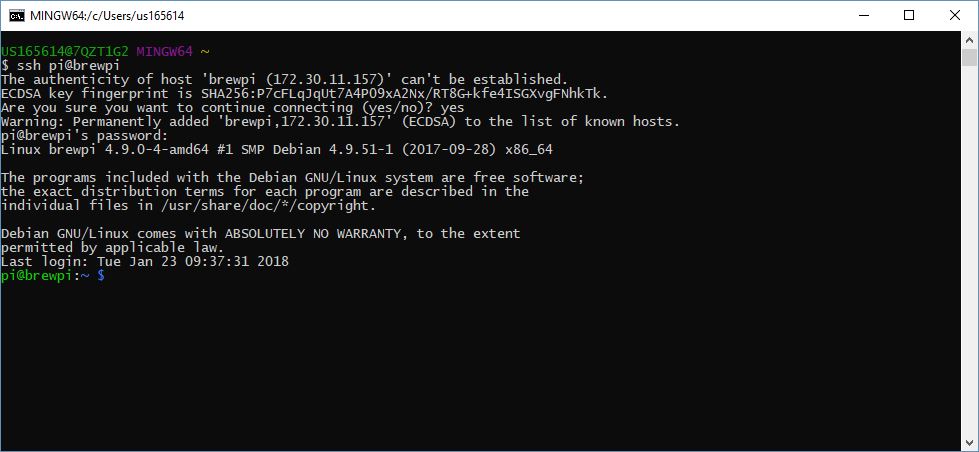
For the rest of the Raspberry Pi configuration, I’m going to be using a remote connection via SSH from my actual workstation, you can leave your keyboard and mouse plugged in, and use the bash terminal and run all the same commands. I’m doing this because if your like me, you have an old rickety keyboard, some crappy monitor, and no mouse hooked up, so SSH is just easier. Im not going to go into detail about SSH from a Windows machine, you can search that out if you’d like, there are more then a few ways to use SSH from Windows out there (none enabled by default unfortunately). I am using the SSH client that comes with MINGW64, which I have installed because I use Jekyll and Ruby, which is what this blog is written with.
- Connect to the Raspberry Pi via SSH, the default user name is pi:
ssh pi@brewpi- Type
yesto confirm the host certificate fingerprint. - Authenticate with the password you set earlier.
- Update your Raspberry Pi (Packages and Firmware)
sudo apt-get update --fix-missingsudo apt-get upgradesudo apt-get install rpi-updatesudo rpi-update- Reboot after all of these commands have completed
sudo reboot.
- Clone the BrewPi source code repository from my GitHub, I have fixed some dependency issues that have not been merged into the parent repository.
git clone https://github.com/dotps1/brewpi-tools.git ~/brewpi-toolssudo ~/brewpi-tools/install.sh
- You will see a bunch of things going accross the screen, just wait until it prompts you to answer some questions. Follow the on screen prompts. Default values or perfectly fine (just hit enter with the exception of over writing the
/var/www/htmldirectory, you need to put ayin for that one). - After it is complete, you can browse to the system and check out the dashboard by going to
http://brewpi(replace brewpi with what ever you called yours.)
 Thats it for setting up the Raspberry Pi!
Wiring and Construction
Next, lets take a look at the general power schematic, The only thing missing from this sketch, is the Raspberry Pi. This part just hooks up via USB to the Arduino. The Raspberry Pi is the web server, its how you will interface with the BrewPi, setting temperatures and building profiles. Credit to FuzzeWuzze from HomebrewTalk for the schematic.  One other thing I did, was if you go look at the case I suggested you purchase from Amazon, it has a built in outlet. This has many benefits, basically if you go power into that outlet, and then piggy back off it as the source in, you can then keep the power supplies for the Raspberry Pi and the Ardunio Uno inside the case, else you are going to have two temperature probes, and three power cables hanging out of this thing. So you don’t have to go with that case, but I suggest you do. One other perks, is it has a compartment below the panel, this gives you a place to hide wires. So, I just played around with the layout of all my pieces inside my sprinkler case, until I got everything to kind of have a place, then I used small dabs of hot glue to hold everything in place. Here is what it looked like before I glued everything in place:
 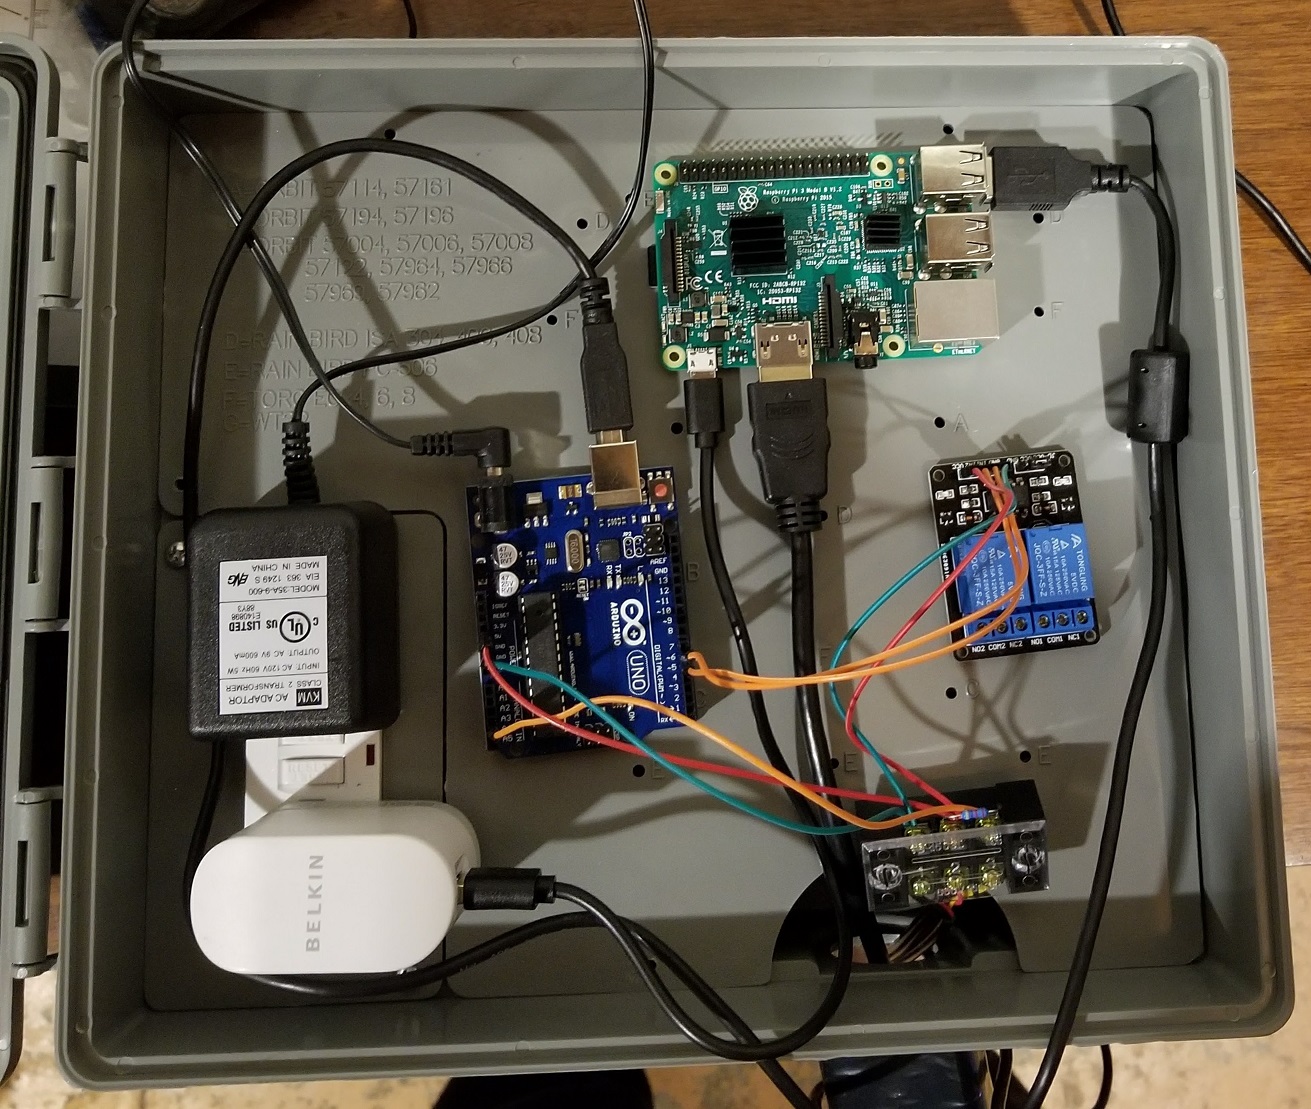 . Next before I glued everything, I cut holes for the specific outlets I purchased (link in shopping list section) in the lower right hand side, below the removable panel (sorry, the best picture of this I had was from the finished product).
 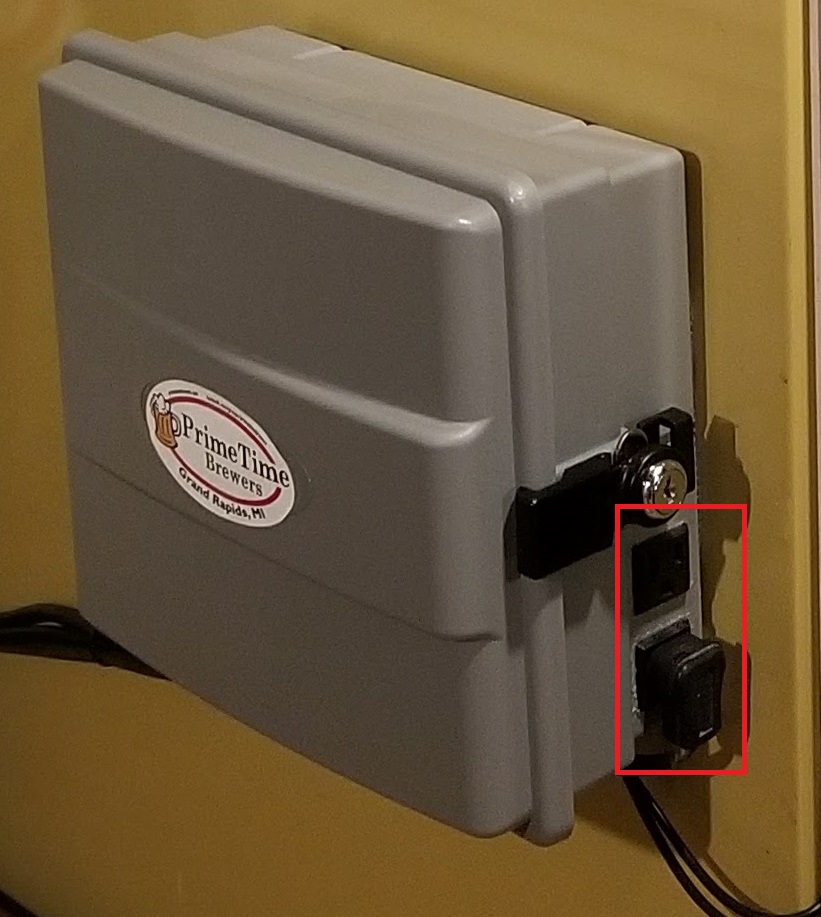 after I got all the outlets in and secured, I then ran wires long enough for them to reach the relay, then I glued all the components and put the panel back in. I did some other little customization, such as the usb cable from the Raspberry Pi to the Arduino Uno, I filed a little notch and ran that behind the panel, because it was a 5ft cord that needed to go 10 inches. You can make yours as nice or as neat as you’d like. Here is the finished product:
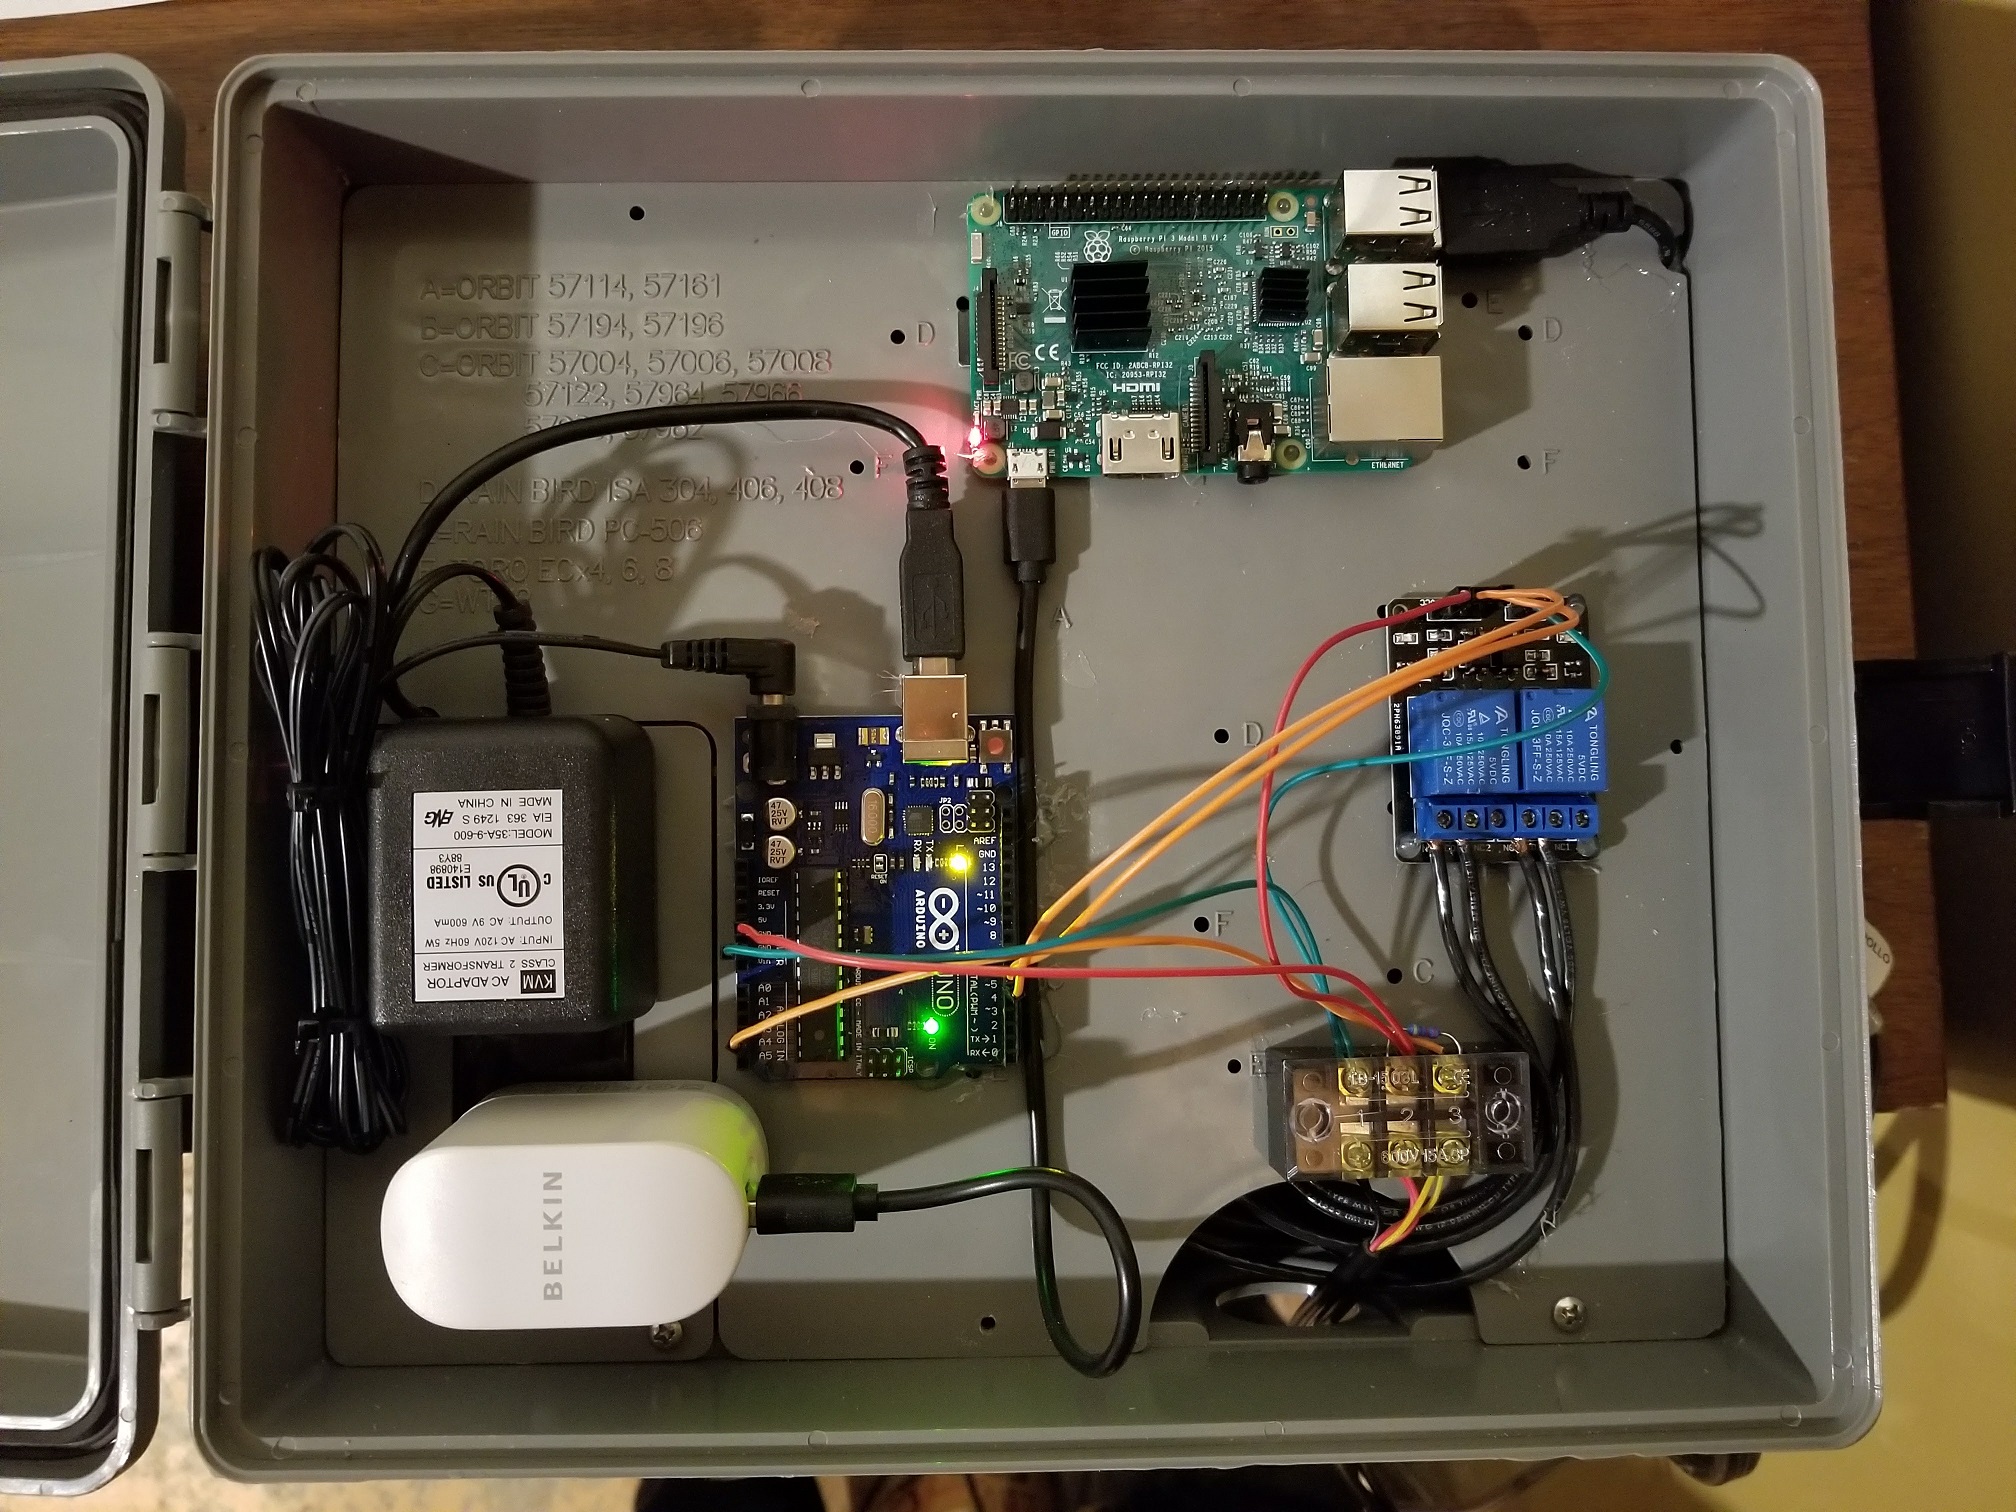
Configuring the BrewPi and Arduino
If you’d made it this far, congratulations, you’re almost done, and its almost time for a beer. The only thing left to do is to actually configure your BrewPi to talk to the Arduino Uno.
- First you need to roll back to the legacy version that supports the Arduino Uno
sudo ~/brewpi-tools/updater.py --ask- Select the
legacybranch (option 1). - Confirm your selection with a wack on the enter key!
- Select the
legacybranch for the web interface as well (Option 3 this time). - Wack enter again to confirm.
- Say
n(no) to check for the firmware you already did this with when you flashed the hex file to the Arduino Uno.
Now if you go back to the web interface, in the top right, the script will be running (this may take a few minutes). Now, the only thing left to do is identify and configure your temperature probes and heating/cooling elements, to do this go to the maintenance panel (top right).
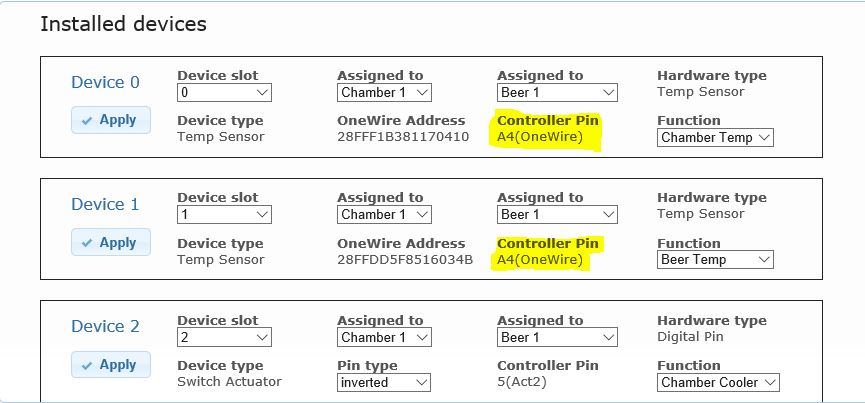
- Your temp probes are going to be on the A4(One Wire) pin. Your going to have to just hold one in your hand and then wait for the temperature to change on the LCD panel display, and then mark one the Chamber Temp and then the other the Beer Temp (I keep a piece of duct tape around one wire so I can keep track).
- Next mark your heater and cooler controller pin 5 and 6, and be sure to mark both as Inverted. And change the Function to Chamber Heat and Chamber Cool. You’ll have to plug something in to see which is which. You can go to the Advanced Tab and change the mode to Test Mode to help you identify which is which.
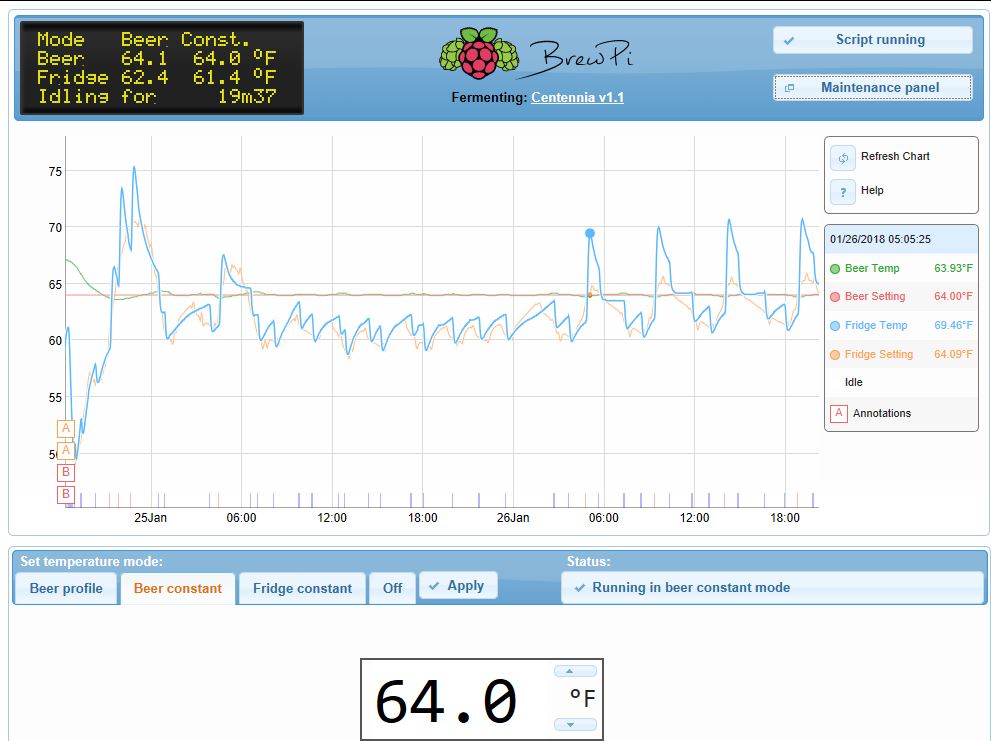
And thats it, you’ve made your BrewPi! You can control temperatures via Beer, fridge, or a profile. So go have some fun!
Here is an IPA I have fermenting right now:

Just a beer drinking Github-er, automating daily tasks with PowerShell, or whatever. And sometimes I go outside and ride my bike. But mostly I just drink beer.